Huawei HiSilicon Android Smartphones
SOFTWARE TESTPOINT:
This feature allows setting the device to factory mode - HUAWEI USB COM 1.0 without disassembling the phone, and without connecting hardware testpoint to it. No need to search for the schematics of testpoints.
STEP 1: Prepare original update.app flash file
It must exactly match the smartphone’s firmware version:
- You may take it from update_sd_base firmware folder
- Use SD_update file type for the latest Android versions (Android 10.0.1, Android 10.1 and higher). Use the same or higher firmware version.
- Don't forget to write down for yourself original firmware version of the device
STEP 2: Software testpoint - ON
- Select "HISILICON" platform from the tab menu in the upper left side of the software
- Go to the "Service" bookmark
- Connect the phone to PC using USB cable in Upgrade mode:
- Android 10: Press and hold VOL+ and Power ON buttons. Select "Upgrade mode -> USB upgrade" from the menu that will appear.
- Android 9 and lower: vol+vol- and connect USB cable
- Important: SD-card should be removed from the phone.
- Press "Software Testpoint ON.../OFF" button
- Select original update.app flash file in the menu that will appear (main file)
- The device should now enter "Factory mode - HUAWEI USB COM 1.0"
Now you are free to run different service operations, like Remove FRP or Huawei ID, Read/Write operations, etc.
Important. If for performing software testpoint operation you used the firmware version that differs from the one that is currently written in your phone, we strongly recommend to perform Enable Downgrade in the Service tab as the first operation right after software testpoint.
It is necessary for correct flashing of the device via Update mode in future.
STEP 3: Software testpoint - OFF
After completing all service operations, you need to set the testpoint OFF. This operation revives the phone from "HUAWEI USB COM 1.0" state and the device powers On normally.
CASE A: if you used the same firmware version for Software testpoint:
- Press "Software Testpoint ON.../OFF" button - it will power on normally. If you used the same firmware version - no need to reflash the phone.
CASE B: if you used higher firmware version for Software testpoint:
- If update.app file used for software testpoint wasn't much different from the phone's firmware version, then the phone has to power On normally
- If the phone did not power ON normally, please reflash the device with full firmware (all parts)
You perform this operation at your own risk.
FRP Remove and Huawei ID remove:
- Testpoints gallery: boot-loader.com -> Downloads -> Sigma Free Section -> Testpoints
- Drivers for device HUAWEI USB COM 1.0
- Select "HISILICON" platform from the tab menu in the upper left side of the software
- Go to "Service" bookmark
- Select the required platform from the right drop-down list.
- Connect the phone to PC using USB cable
- Select "HUAWEI USB COM 1.0" device in the ports selection tab*
- Press "Remove Huawei ID" button
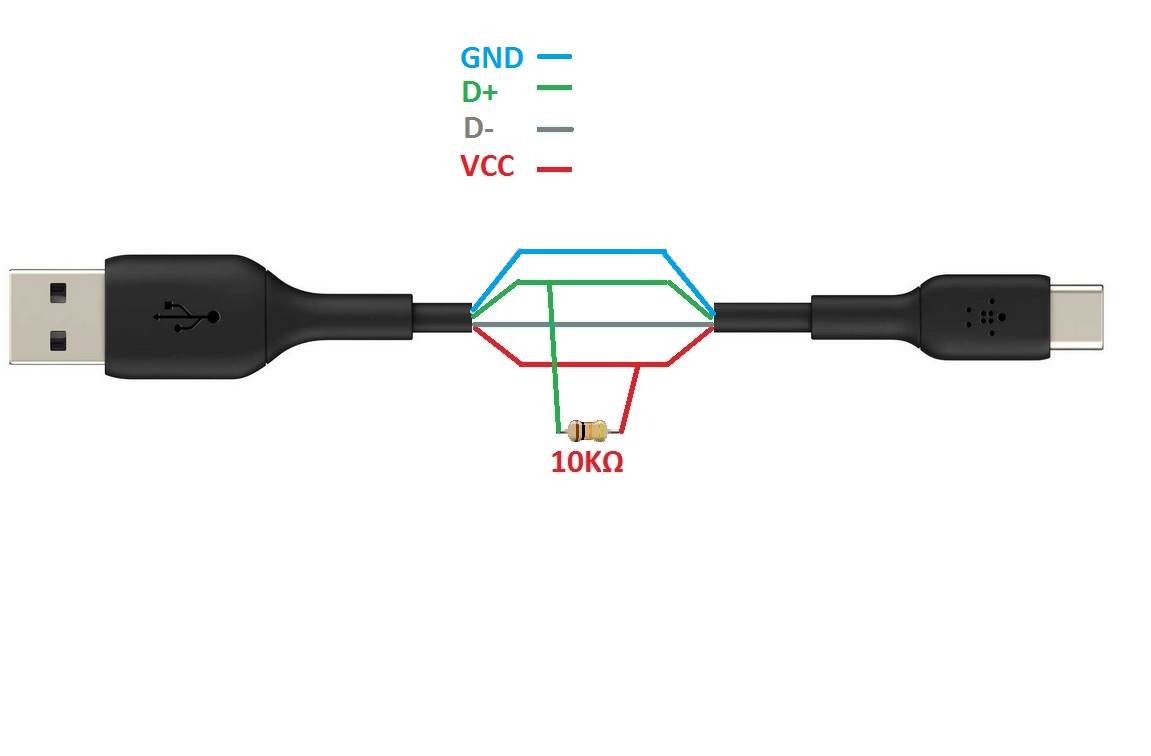
- If you are using a modified cable (with a resistor), at some stage you will be asked to disconnect the modified USB cable from the phone and connect the phone to the PC using the regular USB cable (without resistor).
Attention! If you continue with the modified cable, the service operation will fail! - The message "Removing Huawei ID… Done" indicates that the procedure has been completed. Start the phone and check if the ID lock is removed.
Note for devices with high/specific firmware versions:
In order to Remove Huawei/Honor ID on 2.0.0.230 version or higher, perform following operations:
- IMPORTANT! Read phone’s firmware (backup)
- Downgrade phone’s firmware version
- Run Remove Huawei ID operation
For high firmware versions: If master reset is performed manually or automatically after returning to high firmware version, the device will be ID-locked again. Don't flash the phone with the SD_Update files to return to the high version. You can safely return to high version with the OTA-updates.
Some Huawei firmware versions have a bug that allows you to remove FRP using "Safe mode" method. Huawei developers are aware about this bug and it is fixed in the latest firmware versions.
START:
- Enter Recovery Mode by pressing Vol+ and Power On.
- Check if "Safe mode" is present in the Recovery Menu.
SAFE MODE menu is present:
- Perform wipe data/cache and then press "Safe mode" menu. The phone will start in the Safe mode.
- Go to the menu and select System -> Reset -> Reset all settings.
SAFE MODE menu is NOT present in the Recovery Menu, or the previous method did not work:
- You need to change the phone's firmware to the one with the bug.
- The easiest way is to use the flash files marked with "Downgrade to bypass FRP". Or downgrade the phone to lower official firmware version. Read "Enable downgrade" group of manuals.
NOTE! The flashing operation is very risky!
Do the operation at your own risk. We are not responsible for any damages.
This feature is intended for advanced users only.
Read the phone info before flashing and use flash file with the same customization settings as is in the phone.
You will have to use hardware testpoint and modified USB cable.
Follow these steps exactly in this order:
- Turn off the phone. Battery must be connected to the phone's board and fully charged.
- Disconnect the cable from the phone and the computer
- Short the testpoint to the ground
- Connect the cable to the phone
- Connect the cable to the computer
On this stage HUAWEI USB COM 1.0 device will appear in the system.
Proceed to the device servicing.
ENABLE DOWNGRADE:
Before downgrading the phone, we recommend to Read Firmware from the device.
- Select "HISILICON" platform from the tab menu in the upper left side of the software
- Go to "Flash" bookmark
- Select from drop-down list the required platform that fits to your device HiSilicon [ Kirin XXX ][v]. If you do not select the platform, the software will ask you to select *.xml file from the factory software that fits this phone (in the manufacturer's original format).
- Connect the phone to PC using USB cable in factory mode. In most cases Testpoint has to be used to force the device to enter FACTORY mode. The phone should be detected as HUAWEI USB COM 1.0 device (VID12D1 PID3609) in the System.
- Select "HUAWEI USB COM 1.0 device" in the ports selection tab.
- Press the “ENABLE DOWNGRADE” button
This feature works if it is allowed by phone's bootloader.
You need to reflash the phone after using this feature.
NOTE! The downgrade operation is very risky! This feature is intended for advanced users only.
Do the operation at your own risk. We are not responsible for any damages.
It is possible to downgrade Android version and to downgrade firmware version.
Main things that you need to understand before performing the service operation.
Change firmware versions within one android version:
- The procedure is performed through the original boot of the phone.
- The software opens special gate in the phone and allows the phone to ignore firmware version that we flash to it
- So, after the gate opening, your phone may accept any firmware version, even from another phone model.
- BUT unfortunately this doesn’t mean that the phone will power back ON with this new version.
Downgrade Android version:
- If you want to Downgrade version of Android, use "ROLLBACK" flash files type.
- This can be critical when you are performing downgrade from Android 9 to 8.
STEP 1: Read from Fastboot mode and write down for yourself the following information:
- original phone firmware and Android version
- original phone model
- customization version
You may use Remove FRP feature on Service tab, it reads the phone information from Fastboot mode.
STEP 2: Prepare the firmware file for downgrading
- Unpack update.app flash file and localization file
- It must be full SD-Upgrade package, not OTA update.
- You can use OTA-UPGRADE files marked with "FullOTA-MF", but read the manual: "Flashing / Downgrading using full OTA UPDATE files"
STEP 3: Prepare the downgrade *.skf file
You can download the downgrade *.skf files from bootloader.com, free section -> Huawei -> Downgrade files, or here (installer with addons for all models).
The chosen downgrade file has to:
- exactly fit your phone model and Android version
- be the SAME firmware version as is in the phone now
- be the same customization version
STEP 4: Set the phone to Upgrade mode
- SD-card should be removed from the phone
- vol+vol- and connect USB cable
STEP 5: Select lower fw version + downgrade file
- Open HiSilicon tab and go to Flash bookmark
- Select DBA adapter port in the ports tab
- Select files for flashing
Important! You need to select 3 files for downgrading exactly in this order:
- FLASH FILE 1: UPDATE.APP from update_sd_base folder
- FLASH FILE 2: UPDATE.APP from customization folder
- FLASH FILE 3: Special downgrade file in *.skf format that fits to your actual model, phone's firmware version and customization version. We prepared it in step 3.
Do not mix up the order of flashing.
STEP 6: Downgrade the phone
- Press “Enable Downgrade” button and wait until the phone is downgraded.
- Clear data and cache via recovery menu
NOTE! The downgrade operation is very risky! This feature is intended for advanced users only.
Do the operation at your own risk. We are not responsible for any damages.
STEP 1: Save (or write down) original version of your phone:
Read from Fastboot mode and write down for yourself the following information:
- original phone firmware version
- original phone model
- customization version
You may use Remove FRP feature on Service tab, it reads the phone information from Fastboot mode.
STEP 2: Prepare the firmware file for downgrading:
Prepare original Huawei flash file (only SD-Upgrade files) and unpack it.
The firmware consists of 3 archives. Every archive contains unique UPDATE.app and PTABLE.app files.
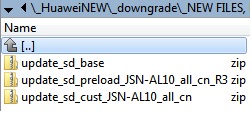
so you need to unpack each archive. Don't mix up the files!
into separate folder.
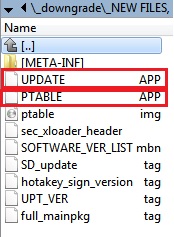
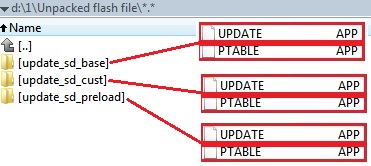
Every folder has to contain UPDATE.APP and PTABLE.APP files:
- update_sd_base folder: UPDATE.APP and PTABLE.APP
- update_sd_cust folder: UPDATE.APP and PTABLE.APP
- update_sd_preload folder: UPDATE.APP and PTABLE.APP
IMPORTANT: Firmware for downgrading has to:
- Contain of 6 files (UFS type)
- Be the same customization/region version as in the phone
- Be LOWER version than the phone's firmware
STEP 3: Prepare the downgrade *.skf file:
You can download the downgrade *.skf files from bootloader.com, free section -> Huawei -> Downgrade files, or here (installer with addons for all models).
The chosen downgrade file has to:
- exactly fit your phone model
- be the SAME firmware version as is in the phone now
- be the same customization version
STEP 4: Set the phone to Upgrade mode:
- SD-card should be removed from the phone
- Press and hold VOL+ and Power ON buttons. Select "Upgrade mode -> USB upgrade" from the menu that will appear
STEP 5: Select lower fw version + downgrade file:
- Open HiSilicon tab and go to Flash bookmark
- Select DBA adapter port in the ports tab
- Select files for flashing:
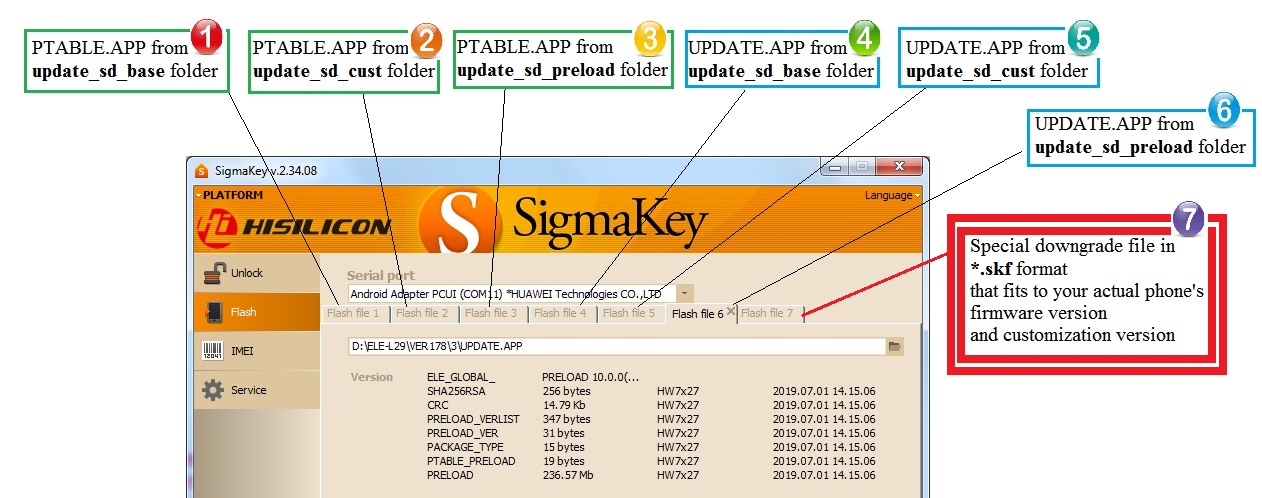
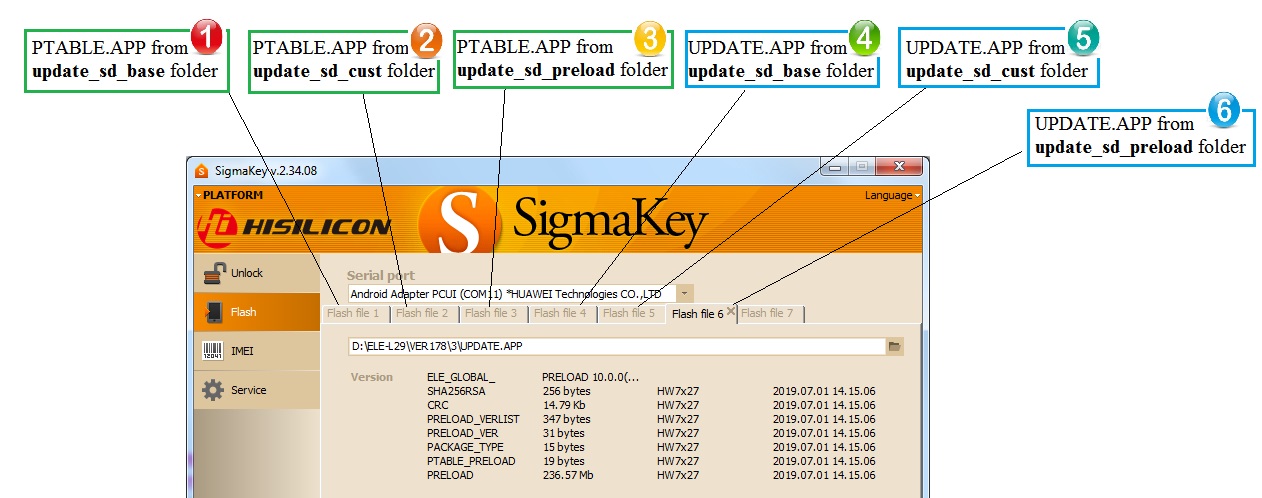
Important! You need to select 7 files for downgrading exactly in this order.
FLASH FILE 1: PTABLE.APP from update_sd_base folder
FLASH FILE 2: PTABLE.APP from update_sd_cust folder
FLASH FILE 3: PTABLE.APP from update_sd_preload folder
FLASH FILE 4: UPDATE.APP from update_sd_base folder
FLASH FILE 5: UPDATE.APP from update_sd_cust folder
FLASH FILE 6: UPDATE.APP from update_sd_preload folder
FLASH FILE 7: Special downgrade file in *.skf format that fits to your actual model, phone's firmware version and customization version. We prepared it in step 3.
If you mix up the order of flashing, this will cause phone's death!
STEP 6: Downgrade the phone:
- Press “Enable Downgrade” button and wait until the phone is downgraded.
- Downgraded phones are open to methods of REMOVE FRP using SAFE MODE.
NOTE! The downgrade operation is very risky! This feature is intended for advanced users only.
Do the operation at your own risk. We are not responsible for any damages.
Service Operations:
These service features allow to:
- Copy the IMEI of Phone 1 and restore it to Phone 2 (in case the phone 1 is damaged)
- Restore your phone's IMEI when replacing smartphone's motherboard. You can read secure data, replace the hardware, and then write secure data to new hardware. This preserves the original IMEI(s) and network lock state.
- Replace an old active mobile with the new one, saving IMEI number.
- Backup and restore original IMEI(s) and network lock state.
Procedure:
- Select "HISILICON" platform from the tab menu in the upper left side of the software.
- Go to "Service" bookmark
- Select the required platform that fits to your device HiSilicon [ Kirin XXX ][v] from a drop-down list.
- Connect the phone to PC using USB cable in the FACTORY mode - "HUAWEI USB COM 1.0" state:
- It should be detected as HUAWEI USB COM 1.0 device (VID12D1 PID3609) in the System.
- In most cases hardware Testpoint has to be used to force the device to FACTORY mode.
- You can also use Software Testpoint - this feature allows you to set the device to Factory mode - HUAWEI USB COM 1.0 without disassembling the phone, and without connecting hardware testpoint to it. No need to search for the schematics of testpoints. Please read the required manual.
- Select "HUAWEI USB COM 1.0 device" in the ports selection tab.
- FOR READING SECURITY DATA:
- Press "Read security data" for reading. It will be saved into Sigma *.skb format
- FOR WRITING SECURITY DATA:
- Press "Write security data" for restoring existing security file
- The message "Done" indicates that procedure has been completed successfully
Note:
- Devices based on Kirin 970 have two methods of signing certificates:
- Method 1: new models P20, P20 Pro, and others
- Method 2: older models Mate 10, and others
When writing the certificate (for example from other model) you will have to choose repair method manually. If after performing the operation via chosen method IMEI will not be repaired successfully, repeat the operation choosing the other method.
- Backup made during the "Write secure data..." procedure can be restored only on the same hardware, i.e. if something went wrong.
- List of plafrorms with compatible certificates: Kirin 710 / 710A / 810 / 820 / 980 / 985 / 990 / 990 5G.
- Select "HISILICON" platform from the tab menu in the upper left side of the software
- Go to the "Service" tab
- Turn the phone OFF
- Set the phone to FastBoot mode:
Press and hold the “VOL-“ button and connect the phone to PC, using USB cable (or use any other method) - Select the “Android ADB interface” port
- Press the “Get device info” button
- The information will be displayed in the log
- Disconnect the device
Information about base, custom, preload versions can be read from the phone's oem-zone and may not match the current phone version.
- Select "HISILICON" platform from the tab menu in the upper left side of the software
- Go to "Unlock" bookmark
- Select the required platform that fits to your device HiSilicon [ Kirin XXX ][v] from a drop-down list
- Connect the phone to PC using USB cable in the FACTORY mode - "HUAWEI USB COM 1.0" state:
- It should be detected as HUAWEI USB COM 1.0 device (VID12D1 PID3609) in the System.
- In most cases hardware Testpoint has to be used to force the device to FACTORY mode.
- You can also use Software Testpoint - this feature allows setting the device to factory mode - HUAWEI USB COM 1.0 without disassembling the phone, and without connecting hardware testpoint to it. No need to search for the schematics of testpoints.
- Select "HUAWEI USB COM 1.0 device" in the ports selection tab.
- Press "Direct Unlock" button
- The message "Unlocking… Done" indicates that procedure has been completed successfully
- Select "HISILICON" platform from the tab menu in the upper left side of the software.
- Go to "Service" bookmark.
- In the right drop-down list, select the required platform.
- Connect the phone to PC using USB cable.
- Select "HUAWEI USB COM 1.0" device in the ports selection tab*
- Press "Repair "Chip is damaged" button.
- If you are using a modified cable (with a resistor), at some stage you will be asked to disconnect the modified USB cable from the phone and connect the phone to the PC using the regular USB cable (without resistor).
- Pop-up window with request to use Chip data file will appear
- Select the prepared Chip Data File that was previously backed up from the working device
- The message "Repairing… Done" indicates that the procedure has been completed. Start the phone and check it.
Attention! If you continue with the modified cable, the service operation will fail!
For older versions of Kirin 820 / 985 devices (fw: 10.x.x), you can fix "CHIP IS DAMAGED" issue using the following methods:
- downgrade the firmware version
or - flash the higher firmware version and perform the Repair "Chip is damaged" service operation
Note for devices with high/specific firmware versions:
To Repair “Chip is damaged” issue on 2.0.0.230 version or higher, perform following operations:
- Read phone’s firmware version (backup)
- Downgrade phone’s firmware version
- Run Repair “Chip is damaged” operation
For high firmware versions: If master reset is performed manually or automatically after returning to high firmware version, the device will be ID-locked again. So don't flash the phone with the SD_Update files to return to the high version. You can safely return to high version with the OTA-updates.
- Select "HISILICON" platform from the tab menu in the upper left side of the software.
- Go to "Service" bookmark.
- Select the required platform from the drop-down list on the right.
- Connect the phone to PC in factory mode using USB cable. In most cases, Testpoint has to be used to force the device to enter FACTORY mode.
- Select "HUAWEI USB COM 1.0" device in the ports selection tab*
- Press "Backup chip data..." button.
- If you are using a modified cable (with a resistor), at some stage you will be asked to disconnect the modified USB cable from the phone and connect the phone to PC using the regular USB cable (without resistor).
- The backup will be saved in Sigma original format in the security backups folder.
Attention! If you continue with the modified cable, the service operation will fail!
This feature allows backing up sensitive information from the device that will be used for Repair “Chip is Damaged” issue on Huawei/Honor devices.
- List of platforms with compatible Chip Data files: Kirin 710 / 710A / 810 / 820 / 980 / 985 / 990 / 990 5G
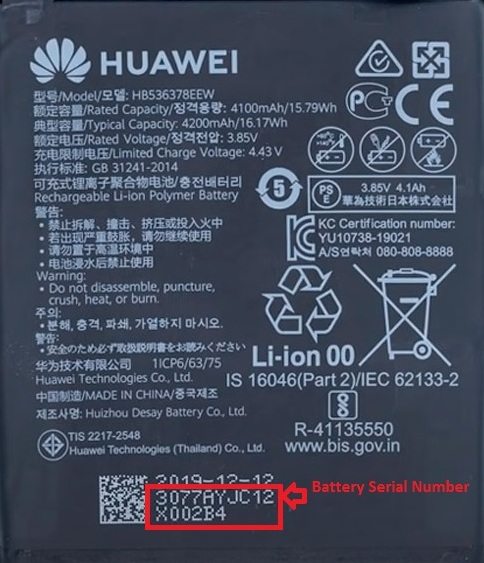
When changing phone battery to the other one / not original one, some firmware versions may verify the serial number of new battery. If the SN is not compatible, the phone may not turn on.
In this case, for phone’s proper operation, it is necessary to write a new battery serial number to the phone.
The serial number of the battery is located next to the quad code. This is a special code consisting of 16 letters and numbers. The new battery must be compatible with the phone.
What is it for?
This information includes network settings and other sensitive phone data.
In the HiSilicon-Service tab you can backup calibration data from a working set and restore it into the corrupted one. During the Restore operation, your phone's original calibration backup will be saved, so you will be able to restore it if necessary.
How to connect?
You need to connect the phone to PC using Software of Hardware testpoint.
Flash:
Read Firmware feature is supported for the following CPU's:
Kirin 710 / 810 / 820 / 970 / 980 / 985 / 990 / 990 5G.
- Select "HISILICON" platform from the tab menu in the upper left side of the software
- Go to the "Flash" bookmark
- Select the required platform that fits your device HiSilicon [ Kirin XXX ][v] from a drop-down list.
- Connect the phone to PC using USB-cable in factory mode.
- You can also use Software Testpoint - this feature allows you to set the device to Factory mode - HUAWEI USB COM 1.0 without disassembling the phone, and without connecting hardware testpoint to it. No need to search for the schematics of testpoints. Please, read the required manual.
- Select "HUAWEI USB COM 1.0 device" in the ports selection tab
- Press "Read firmware" button and wait until the operation is completed.
The firmware will be saved in *.xml factory format.
It is possible to read firmware from one phone and write it to the other.
If the phone's software is damaged (detected as "HUAWEI USB COM 1.0"), this service feature allows you to enter fastboot mode and recover the phone by fastboot flashing
- Select "HISILICON" platform from the tab menu in the upper left side of the software
- Go to the "Service" bookmark
- Select from drop-down list the required platform that fits your device HiSilicon [ Kirin XXX ][v]. If you do not select the platform, the software will ask you to select *.xml file from the factory software that fits this phone (in the manufacturer's original format).
- Connect the phone to PC using USB cable in factory mode. In most cases Testpoint has to be used to force the device to enter FACTORY mode. The phone should be detected as HUAWEI USB COM 1.0 device (VID12D1 PID3609) in the System.
- Select "HUAWEI USB COM 1.0 device" in the ports selection tab.
- Press the "Load fastboot" button
- The message "Done" indicates that procedure has been completed successfully
You need to reflash the phone after using this feature.
STAGE A: LOAD FASTBOOT
- Select "HISILICON" platform from the tab menu in the upper left side of the software
- Go to the "Service" bookmark
- Select the required platform that fits your device HiSilicon [ Kirin XXX ][v] from a drop-down list. If you do not select the platform, the software will ask you to select *.xml file from the factory software that fits this phone (in the manufacturer's original format).
- Connect the phone to PC using USB cable in factory mode. In most cases, Testpoint has to be used to force the device to enter FACTORY mode. The phone should be detected as HUAWEI USB COM 1.0 device (VID12D1 PID3609) in the System.
- Select "HUAWEI USB COM 1.0 device" in the ports selection tab
- Press "Load fastboot" button and wait until the flashing operation is completed.
The phone should enter fastboot mode.
STAGE B: Flash the phone with original Update.APP firmware files
- Go to "Flash" bookmark in "HiSilicon" tab.
- Select the corresponding firmware files just as it is described in the UPGRADE MODE flashing manual.
- Reflash the phone.
Important! You need to select different amount of files for phones with UFS flash type, and for old phones / phones without UFS flash type. That’s why in each specific case you need to choose flash files for each certain phone/version.
NOTE: It is possible to perform the operation in one stage - flash the phone via testpoint with original flash files directly from "Flash" bookmark. But this may cause conflicts with the software if you have Huawei PC Suite installed on your PC.
So, we recommend to use stage A, then stage B.
- Select "HISILICON" platform from the tab menu in the upper left side of the software
- Go to the "Service" bookmark
- Select from drop-down list the required platform that fits your device HiSilicon [ Kirin XXX ][v]. If you do not select the platform, the software will ask you to select *.xml file from the factory software that fits this phone (in the manufacturer's original format).
- Connect the phone to PC using USB cable in the FACTORY mode - "HUAWEI USB COM 1.0" state:
- It should be detected as HUAWEI USB COM 1.0 device (VID12D1 PID3609) in the System.
- In most cases hardware Testpoint has to be used to force the device to FACTORY mode.
- You can also use Software Testpoint - this feature allows setting the device to factory mode - HUAWEI USB COM 1.0 without disassembling the phone, and without connecting hardware testpoint to it. No need to search for the schematics of testpoints.
- Select "HUAWEI USB COM 1.0 device" in the ports selection tab
- Press the "Read OEM INFO" or "Write OEM INFO" button
- If you run the "Read OEM INFO" operation, the program will ask you to select OEM info file in *.bin format. Select it and the flashing process will start.
You need to reflash the phone after using this feature.
NOTE! This service operation is very risky! This feature is intended for advanced users only.
You are performing this operation at your own risk. We are not responsible for any damages.
NOTE! Devices on Kirin 980:
We do not recommend restoring OEM-info area from other phones. In order to write data in OEM info zone correctly, please Repair Vendor/Country/Model and reflash the phone.
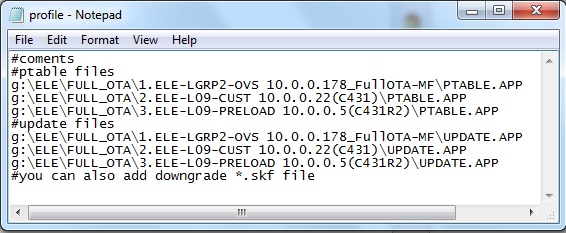
Here is an example of how to create a profile for flashing a phone whose firmware consists of 6 files.
You can add any number of firmware files to the file or add paths to the downgrade file.
Warning! The files must be selected in the correct order. They will be opened in the software in this sequence
You can add coments in the file, they must be marked with #. The software will ignore # and following characters in the line.
- Create and save *.txt file in such format:
- path to PTABLE.APP from update_sd_base file
- path to PTABLE.APP from update_sd_cust file
- path to PTABLE.APP from update_sd_preload file
- path to UPDATE.APP from update_sd_base file
- path to UPDATE.APP from update_sd_cust file
- path to UPDATE.APP from update_sd_preload file
- Open the Flash bookmark in the software and select this profile file (in txt format). Selected flash files will be opened in the software.
This service option is experimental. We strongly recommend you to make the firmware back up before performing this operation.
STAGE 1 - Prepare Flash File
Prepare new flash file that is suitable for your phone.
Let’s take this file as an example:
Huawei Mate 20 Pro LYA-L29 hw eu HLRCF Laya-L29C 9.1.0.358(C432E10R1P16) Firmware EMUI9.1.0 05015KYS.zip
As we can read from that file, it is designated for the phone with the following parameters:
Model: LYA-L29
Vendor: hw
Country: eu
STAGE 2 - Convert the phone
- Perform Software TestPoint ON (or use hardware testpoint)
- Perform "Enable downgrade" on Flash tab
- Write new Model/Vendor/Country in IMEI tab. Use Vendor/Country/Model settings from the flash file that you will use for reflashing.
- Perform "TestPoint OFF" (or turn OFF the phone, if you used hardware testpoint)
STAGE 3 - Reflash the phone
- Reflash the phone with new flash file in Upgrade mode. We don't recommend reflashing in fastboot mode!
- Pefrorm Master reset
- The DEMO phone is supposed to be converted to fully functional device.
If the phone is software damaged, but can enter Fastboot mode, this feature allows you to enter Upgrade mode. Works for Huawei HiSilicon based smartphones (up to Android 9.0).
- Important: read original phone firmware version from Fastboot mode
- Open FLASH bookmark on HiSilicon tab
- Select original update.app / cust.app firmware of the same version as the phone's firmware version and it's region (SD-Update files).
- Connect the phone in Fastboot mode (by pressing and holding Vol- and Power On)
- Press "Enter Rescue mode" button
- Type #*#2846579#*# on the phone.
- Go to Project Menu -> Network information -> vendor Country Info
- Use original flash files with the same customization settings.
This feature is intended to be used for phones that won’t turn on, freeze on logo, etc., but still can enter fastboot mode. It's not intended for regular reflashing.
Procedure:
- Connect the phone in fastboot mode (vol- power ON) to PC
- Select corresponding firmware files just as it is described in the UPGRADE MODE flashing manual.
Important! You will have to select different amount of files for phones with UFS flash type and for old phones / phones without UFS flash type. That’s why in each specific case you need to choose flash files for each certain phone/version. - When the phone starts up normally, reflash it in UPGRADE mode using the corresponding to it flash file
Benefits:
STEP 1: Save (or write down) original version of your phone:
Read from Fastboot mode and write down for yourself:
- original phone firmware version
- original phone model
- customization version
You may use Get device info feature on Service tab, it reads the phone information from Fastboot mode.
STEP 2: Prepare the firmware files:
Unpack original Huawei flash file.
It must be full SD-Upgrade package, not OTA update.
Phones with UFS flash type:
The firmware consists of 3 archives. Every archive contains unique UPDATE.app and PTABLE.app files.
You need to unpack each archive. Don't mix up the files!
into separate folder!
- update_sd_base folder: UPDATE.APP and PTABLE.APP
- update_sd_cust folder: UPDATE.APP and PTABLE.APP
- update_sd_preload folder: UPDATE.APP and PTABLE.APP
Every folder has to contain UPDATE.APP and PTABLE.APP files.
Old phones / phones without UFS flash type:
Unpack update.app flash file and localization file (if your firmware contains this localization.app file).
STEP 3: Set the phone to Upgrade mode:
Phones with UFS flash type: Press and hold VOL+ and Power ON buttons. Select "Upgrade mode -> USB upgrade" from the menu that will appear.
Old phones / phones without UFS flash type: vol+vol- and connect USB cable.
Important: SD-card should be removed from the phone.
STEP 4: Select files for flashing:
- Open HiSilicon tab and go to Flash bookmark
- Select PCUI port or DBA adapter port (different phone models show different ports) in the port selection tab
- In case the phone does not enter Upgrade mode, try to enter it using Rescue mode entering manual
- Select files for flashing:
Phones with UFS flash type:
Important! You need to select 6 files for flashing exactly in this order.
FLASH FILE 1: PTABLE.APP from update_sd_base folder
FLASH FILE 2: PTABLE.APP from update_sd_cust folder
FLASH FILE 3: PTABLE.APP from update_sd_preload folder
FLASH FILE 4: UPDATE.APP from update_sd_base folder
FLASH FILE 5: UPDATE.APP from update_sd_cust folder
FLASH FILE 6: UPDATE.APP from update_sd_preload folder
If you mix up the order of flashing, this will cause phone's death!
Old phones / phones without UFS flash type:
FLASH FILE 1: Select UPDATE.APP flash file
FLASH FILE 2: Select localization/customization file (if your firmware contains this *.APP file)
STEP 5: Write Flash:
- Press “Write flash” button
- Perform Wipe Data/Cache via phone's recovery
Important! All partitions of the firmware will be written to the phone in Upgrade mode.
NOTE! The flashing operation is very risky! This feature is intended for advanced users only.
Do the operation at your own risk. We are not responsible for any damages.
What is FULL OTA-UPDATE files?
- FULL OTA-UPDATE files are openly located in the internet and are intended for flashing phones in OTA mode.
- The software exclusively allows flashing this type of files. But, this feature is specially designed only for advanced users.
- You may use this type of files for upgrade and for downgrade flashing.
- The main purpose or full OTA files is phone's update, so make downgrade operations at your own risk.
Where to get FULL OTA-UPDATE files?
You can find and download the files for your model here.
How to use FULL OTA-UPDATE files?
- The firmware flashing procedure does not differ from the overall flashing through the UPGRADE MODE described in the UPGRADE MODE flashing manual.
- The only difference is that you need to tick "USE full OTA UPDATE" when you select FULL OTA UPDATE file
- Use only FULL OTA UPDATE files. They are marked with "FullOTA-MF"
WARNING!
Keep in mind that this functionality is only for super-advanced users who clearly understand how to flash Huawei phones!
Use this type of file at your own risk.
Use this guide only for cases, when phone is bricked and doesn’t show any devices while connected to PC, or shows HUAWEI USB COM 1.0 device (VID12D1 PID3609).
Important notes:
- Drivers for device HUAWEI USB COM 1.0
- Factory flash files: boot-loader.com -> Downloads -> Sigma -> Huawei -> Factory Flash files
Also, you may use ORIGINAL board (factory) flash files in .xml format
Procedure:
- Device has to be set to FACTORY mode. It should be detected as HUAWEI USB COM 1.0 in the System. In some cases Testpoint has to be used to force the device to FACTORY mode.
- Repair the device using Board Software file.
After choosing the file, you may either manually select partitions to write, or select one of 4 available profiles:- Don't flash: nothing will be flashed to the device. Just fastboot is loaded into RAM
- Only FastBoot: flash only fastboot partitions
- Partial flashing: main partitions will be flashed
- Full flashing: all partitions from the board software will be flashed.
Warning: when selecting Full flashing mode, you may additionally select factory calibrations areas. But keep in mind that after flashing factory areas, phone’s network and other functions may become unavailable! Also, you may manually select another Kirin bootloader for factory firmware flashing from the Autodetect drop-down menu.
- Reflash the phone using original update.app file in FASTBOOT mode (vol- and insert USB cable)
- Repair Vendor/Country, IMEI and other numbers
- Reflash the phone now in UPGRADE MODE using original update.app file (vol+vol- and insert USB cable)
How to repair your phone if there is no factory flash for your exact platform:
- Select flash for other platform, but based on the same CPU (for example, factory flash file for EVA-AL10, EVA-L29… can be selected for EVA-L09)
- Select profile “Don't flash” and flash the phone.
Bootloader will be downloaded, but nothing will be flashed. - Then use FLASH via fastboot mode and flash the update.app file that suits your phone’s platform
- Repair Vendor/Coutry; IMEI and other numbers
- To finalize repair operation flash your phone via UPGRADE MODE
This feature can be used to adjust phone settings correctly after the device has been flashed with another firmware service provider version. The feature can be found in Hisilicon tab - IMEI Bookmark.
- Tick “+Huawei”
- Fill in the fields "Vendor", "Country" and "Model" with the correct data
- Press "Repair" button
IMPORTANT: Reflash the phone after changing provider settings!
Video Instructions
- EXCLUSIVE Software testpoint for devices on Kirin 710 / 970 / 980 and others (without disassembling)
- Huawei ID remove (Huawei P20) for devices on HiSilicon Kirin 710 / 970 / 980!
- Downgrade Huawei Mate 10 Lite RNE-l21 with Sigmakey
- Huawei P Smart Plus INE-xxx downgrade Android from 9 to 8 with Sigmakey
- Upgrade Huawei P30 ELE-L29 with "FULL OTA UPDATE" flash files
- Huawei P6s IMEI Repair
- Huawei Honor 4C IMEI Repair
- Huawei P7 IMEI Repair
- Honor 6 Plus IMEI Repair
- Huawei P8 Lite Full IMEI Repair
- Huawei D2-0082 IMEI Repair
- Huawei P9 IMEI repair with Sigmakey
- Direct Unlock Huawei P8
- Unlock Huawei Mediapad M1 8.0 S8-301L
- Unlock Huawei P8 Lite
- Unlock Huawei P2-6011
- Unlock Huawei on HiSilicon Kirin 710 with Sigma
- Getting bootloader password for Huawei smartphones easily
- Huawei GT3 read bootloader code with Sigmakey
- Huawei P10 get bootloader code done with Sigmakey
- REPAIR feature for bricked Huawei smartphone
- Vendor / Country / Model repair with Sigma (Kirin 980/970/710 and older)
- Repair Huawei devices using original XML board/factory files
- Flashing via UPGRADE MODE for Huawei smartphones (Honor 6 Plus)
- Flashing via UPGRADE MODE for Huawei smartphones (G510)
- Flashing via UPGRADE MODE for Huawei smartphones (Enjoy 7 Plus)
- Flashing via UPGRADE MODE for Huawei smartphones (U8650)
- FRP Remove for Huawei HiSilicon (new security supported) with Sigmakey
- FRP Remove for Qualcomm Huawei (new security supported) with Sigmakey
- Huawei P10 Plus FRP Remove with Sigmakey
- Kirin 710 Remove FRP Huawei P Smart Plus (INE-LX2)
- Kirin 980 Remove FRP (Huawei Honor 20 Pro YAL-L41)
Before servicing the phone, please make sure that:
- You use the latest version of the software
- Battery must be connected to the phone's board and fully charged. Especially while performing operations using testpoint.
- Huawei devices with latest security versions: you will have to use hardware testpoint and modified USB cable.
- All the side programs, that may interfere with the phone, are closed
- Phone’s cable and device itself should not be disconnected or disturbed until the procedure is fully completed
- Connect phone to USB port placed on the backside of PC (motherboard's USB port)
Do not connect or disconnect other USB cables into the PC during the actual work with the phone - Avoid using any kind of USB HUBs and long USB cables. Use the shortest-length USB cable available.
- Phone has stock (factory) firmware version
- SIM card is removed